
2022 年 10 月 15 日,梦春酱的粉丝数回升到 2000,于是梦春酱非常开心地发布了一条动态,这条动态的其中一张图片里就有 TA 的所有粉丝的头像与昵称。
那么,我们怎么生成这样子的图片呢?这篇文章就教您如何生成含所有粉丝的列表的图片。
🛠️ 准备工作
首先,我们应该获取 B 站页面的 Cookie。
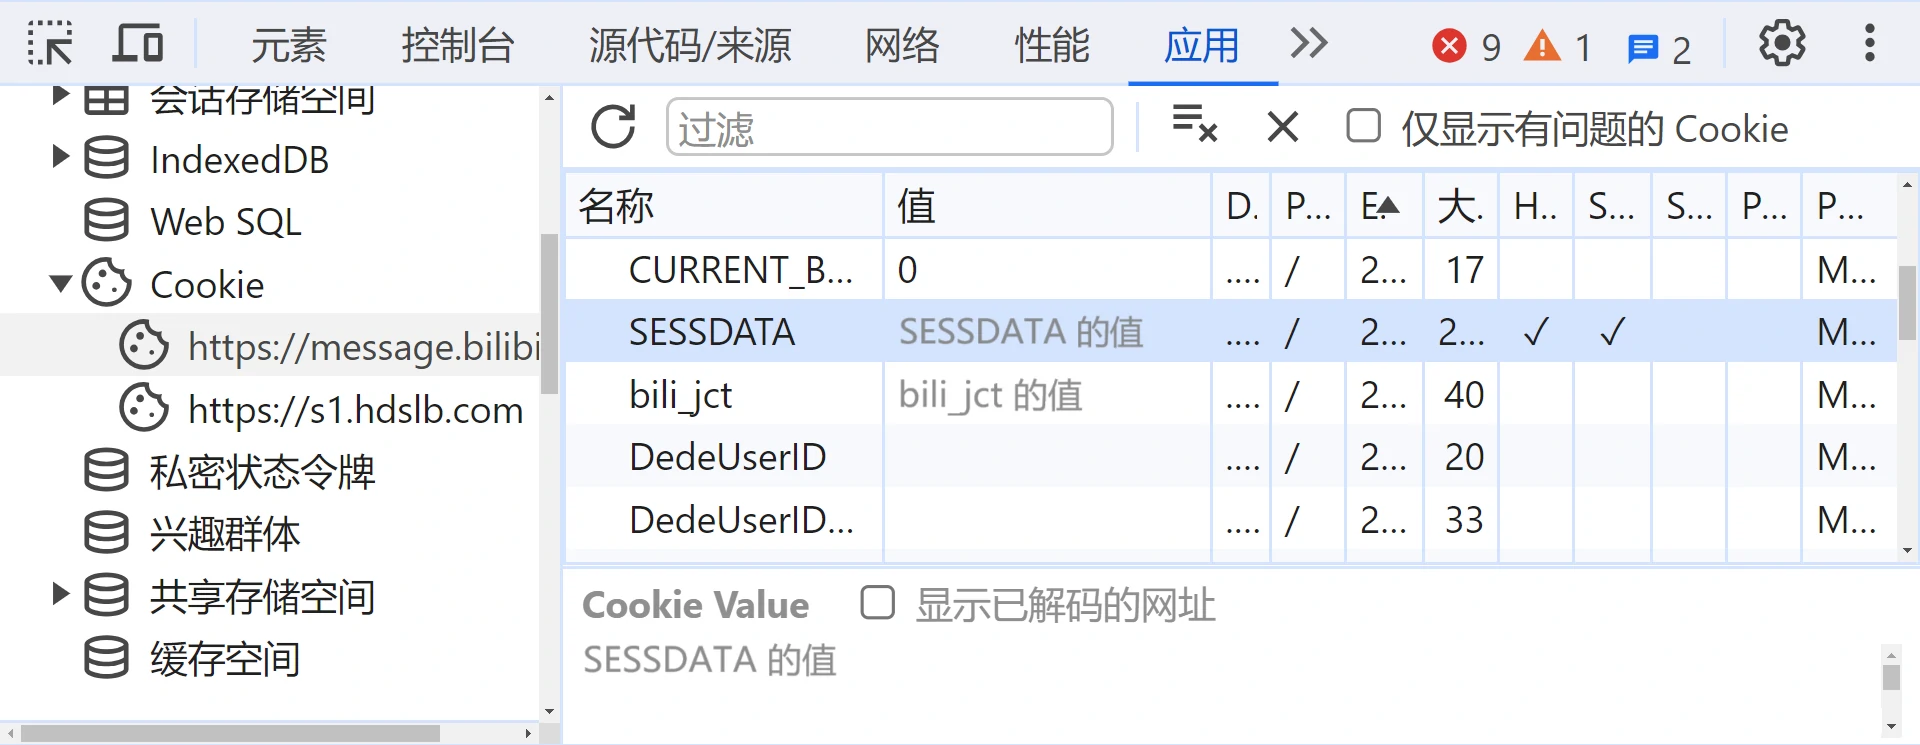
以 Google Chrome 为例:在登录了 B 站账号的浏览器中,打开 B 站任意页面,打开开发者工具(一般按 F12 键即可),在工具上方点击 “应用”,在左侧点击 “存储” 部分中 “Cookie” 左边的箭头,点击下面的 B 站网址,在右侧表格的 “名称” 一栏中找到 “SESSDATA” 与 “bili_jct”,分别双击它们右边的 “值”,复制下来,这样您就获取到了 Cookie。
打开 Node.js,您应该会看到一个命令行窗口。在这个窗口里输入代码 const headers = { Cookie: 'SESSDATA= SESSDATA 的值 ; bili_jct= bili_jct 的值 , Origin: 'https://www.bilibili.com', Referer: 'https://www.bilibili.com/', 'User-Agent': 'Mozilla/5.0 (X11; Linux x86_64) AppleWebKit/537.36 (KHTML, like Gecko) Chrome/123.0.0.0 Safari/537.36' };,便于在后续操作中使用您账号的登录信息。
例:假如 SESSDATA 的值为 1a2b3c4d%2C1789012345%2C5e6f7*ef,bili_jct 的值为 0123456789abcdef0123456789abcdef,那么就输入代码:
const headers = { Cookie: 'SESSDATA=1a2b3c4d%2C1789012345%2C5e6f7*ef; bili_jct=0123456789abcdef0123456789abcdef', Origin: 'https://www.bilibili.com', Referer: 'https://www.bilibili.com/', 'User-Agent': 'Mozilla/5.0 (X11; Linux x86_64) AppleWebKit/537.36 (KHTML, like Gecko) Chrome/123.0.0.0 Safari/537.36' }; // 注意:此 Cookie 仅作为示例展示,请修改成自己的 Cookie📃 第一步 获取所有粉丝的列表
B 站官方给我们提供的获取指定用户的粉丝列表的 API 是 https://api.bilibili.com/x/relation/fans,请求方式是 GET。
这个 API 需要您提供有效的 Cookie,返回的列表按照关注时间的先后顺序逆向排序(越晚关注,就在列表的越前面)。
主要 URL 参数
目标用户 UID
每页项数,默认为 50,且最多为 50
页码,默认为 1
如果这个 API 被正确调用,那么会得到像下面这样的 JSON 回复(仅作示例,省略了部分项目):
{ "code": 0, // 返回值,0 表示成功,-400 表示请求错误 "message": "0", // 错误信息,默认为 “0” // ... "data": { "list": [{ // 粉丝 1 的信息 "mid": 12345678, // 粉丝 UID "attribute": 6, // 该粉丝对于自己的关系,0 表示您未关注 TA,1 表示您悄悄关注了 TA,2 表示您关注了 TA,6 表示您与 TA 互粉,128 表示您拉黑了 TA "mtime": 1678901234, // 最近一次改变目标用户对于该粉丝的关系的秒级时间戳 "tag": [-10], // 该粉丝对于目标用户的关注分组,其中 -10 为特别关注分组;若没有关注或为默认分组,则为 null "special": 1, // 目标用户是否特别关注了该粉丝 "contract_info": { // “老粉计划” 相关信息 "is_contract": true, // 目标用户是否为该粉丝的 “原始粉丝” 或 “老粉”,仅当为真时才显示此项 "is_contractor": true, // 粉丝是否为目标用户的 “原始粉丝” 或 “老粉”,仅当为真时才显示此项 "ts": 1678901234, // 粉丝成为目标用户的 “原始粉丝” 或 “老粉” 的秒级时间戳,仅当 “is_contractor” 项的值为真时才显示此项 "user_attr": 1 // 粉丝是否为目标用户的 “老粉”,仅当为真时才显示此项 }, "uname": "Example", // 粉丝昵称 "face": "https://i0.hdslb.com/bfs/face/xxx.jpg", // 粉丝头像地址 "sign": "个性签名", // 粉丝个性签名 "face_nft": 0, // 头像是否为数字藏品头像 "official_verify": { // 用户认证信息 "type": -1, // 用户认证状态,-1 表示未认证,0 表示 UP 主认证,1 表示机构认证 "desc": "" // 用户认证说明文字 }, "vip": { // 用户会员信息 "vipType": 1, // 用户会员类型 // ... "vipStatus": 1, // 用户会员状态,0 表示没有大会员,1 表示有大会员 // ... }, // ... }, { // 粉丝 2 的信息 // (数据结构同上) }, // ... ], // ... "total": 2000 // 目标用户的粉丝数 }}我们就先来尝试获取一下自己粉丝列表的第 1 页吧(每页 50 个粉丝)。
下面是梦春酱写的代码,记得要在 顶层 或者 异步 函数中运行,在非异步函数中运行会报错,后面梦春酱写的所有代码也需要在顶层或异步函数中运行。
console.log((await (await fetch('https://api.bilibili.com/x/relation/fans?vmid=425503913&ps=50&pn=1', { headers })).json()).data.list); // 注意:请将 “vmid=” 后面的数字修改成自己的 UID运行上面的代码后,正常情况下控制台会显示一个带有很多元素的 数组,而且数组的每个元素都是 对象。
我们可以在上面代码的基础上稍作修改,来获取多页粉丝列表。如果您设置的每页项数为 50,那么您要获取的页数一般为自己的粉丝数除以 50,再向上取整(取不小于该数值的最小整数,如 2.98→3、3→3、3.02→4)。
let followers = []; // 存储粉丝列表for (let i = 1; i <= 20; i++) { // 获取前 20 页粉丝的信息,每页 50 个;这里的页数是根据自己的粉丝数而定的 followers.push(...(await (await fetch(`https://api.bilibili.com/x/relation/fans?vmid=425503913&ps=50&pn=${i}`, { headers })).json()).data.list); // 注意:请将 “vmid=” 后面的数字修改成自己的 UID}这样,“followers” 变量就存储了您的粉丝列表。
ℹ️ 第二步 获取所有粉丝的详细信息、粉丝数(可选)
目前 “followers” 变量虽然存储了所有粉丝的信息,但是这个信息不够详细,比如不包括等级、头像框信息等,我们要想办法获取更详细的粉丝信息。
获取多个用户的详细信息的 API 是 https://api.vc.bilibili.com/x/im/user_infos,请求方式是 GET。
主要 URL 参数
目标用户的 UID 列表,每个成员间用英文逗号 , 分割
如果这个 API 被正确调用,那么会得到像下面这样的 JSON 回复(仅作示例,省略了部分项目):
{ "code": 0, // 返回值,0 表示成功,-400 表示请求错误 "msg": "0", // 错误信息,默认为 0 "message": "0", // 错误信息,默认为 0 // ... "data": [{ // 用户 1 的信息 "mid": 12345678, // 用户 UID "name": "Example", // 用户昵称 "sex": "保密", // 用户性别 "face": "https://i0.hdslb.com/bfs/face/xxx.jpg", // 用户头像地址 "sign": "个性签名", // 用户个性签名 // ... "level": 3, // 用户等级 "silence": 0, // 用户是否被封禁 "vip": { // 用户会员信息 "type": 1, // 用户会员类型 "status": 1, // 用户会员状态,0 表示没有大会员,1 表示有大会员 // ... }, "pendant": { // 用户头像框信息 "pid": 0, // 头像框 ID "name": "", // 头像框名称 "image": "", // 头像框图片地址 // ... "image_enhance": "", // 头像框动态图片地址 // ... }, // ... "official": { // 用户认证信息 "role": 0, // 用户认证类型 "title": "", // 用户认证说明文字 "desc": "", // 用户认证备注 "type": -1 // 用户认证状态,-1 表示未认证,0 表示 UP 主认证,1 表示机构认证 }, // ... "is_deleted": 0, // 用户是否已注销 // ... "face_nft": 0, // 头像是否为数字藏品头像 // ... "is_senior_member": 0, // 用户是否为硬核会员 // ... }, { // 用户 2 的信息 // (数据结构同上) }, // ... ]}获取多个用户的关系状态数的 API 是 https://api.bilibili.com/x/relation/stats,请求方式是 GET。
主要 URL 参数
目标用户 UID 列表,每个成员间用英文逗号 , 分割,最多 20 个成员
如果这个 API 被正确调用,那么会得到像下面这样的 JSON 回复(仅作示例,省略了部分项目):
{ "code": 0, // 返回值,0 表示成功 "message": "0", // 错误信息 // ... "data": { "12345678": { // 用户 1 的状态数 "mid": 12345678, // 用户 UID "following": 234, // 用户关注数 // ... "follower": 345 // 用户粉丝数 }, "23456789": { // 用户 2 的状态数 // (数据结构同上) }, // ... }}于是我们就可以写出下面的代码:
// 获取所有粉丝的详细信息const cjson = await (await fetch(`https://api.vc.bilibili.com/x/im/user_infos?uids=${followers.map(f => f.mid)}`, { headers })).json();if (cjson.code === 0 && cjson.data?.length) { for (const info of cjson.data) { Object.assign(followers.find(f => f.mid === info.mid), info); }}
// 获取所有粉丝的粉丝数const followersWithoutStat = followers.map(f => f.mid), sjsonList = [];
while (followersWithoutStat.length) { sjsonList.push(fetch(`https://api.bilibili.com/x/relation/stats?mids=${followersWithoutStat.splice(0, 20).join(',')}`, { headers }).then(resp => resp.json()));}
for await (const sjson of sjsonList) { if (sjson.code === 0 && sjson.data) { for (const [mid, stat] of Object.entries(sjson.data)) { Object.assign(followers.find(f => f.mid === +mid), stat); } }}这样,“followers” 变量就存储了所有粉丝的信息与粉丝数。
🖼️ 第三步 生成图片
我们既然已经获取到了所需要的信息,就应该要生成粉丝列表的图片了。您可以用自己喜欢的方式生成图片。
梦春酱提供了一种生成图片的方法:先生成 HTML 文件,界面类似于梦春酱的动态里的图片,再在浏览器中截图。
先在 Node.js 中生成 HTML 文件:
const encodeHTML = str => typeof str === 'string' ? str.replace(/&/g, '&').replace(/</g, '<').replace(/>/g, '>').replace(/"/g, '"').replace(/ (?= )|(?<= ) |^ | $/gm, ' ').replace(/\r\n|\r|\n/g, '<br />') : '';
// 此处提供了 2 种样式,您可以任选一个样式// 样式 1:每个粉丝之间换行const html = followers.map(u => `<div class="info"><div class="image-wrap${u.pendant?.image ? ' has-frame' : ''}"><img class="face" src="${u.face}" referrerpolicy="no-referrer" />${u.pendant?.pid ? `<img class="face-frame" src="${u.pendant.image_enhance || u.pendant.image}" referrerpolicy="no-referrer" />` : ''}${u.face_nft ? `<img class="face-icon icon-face-nft${[0, 1].includes((u.official || u.official_verify)?.type) || u.vip?.status ? ' second' : ''}" src="https://www.yumeharu.top/images/default-faces%26face-icons/nft.gif" />` : ''}${(u.official || u.official_verify)?.type === 0 ? '<img class="face-icon" src="https://www.yumeharu.top/images/default-faces%26face-icons/personal.svg" />' : (u.official || u.official_verify)?.type === 1 ? '<img class="face-icon" src="https://www.yumeharu.top/images/default-faces%26face-icons/business.svg" />' : u.vip?.status ? '<img class="face-icon" src="https://www.yumeharu.top/images/default-faces%26face-icons/big-vip.svg" />' : ''}</div> <div><strong>${encodeHTML(u.name || u.uname)}</strong></div></div>`).join('');
// 样式 2:一个粉丝紧跟着另一个粉丝const html = followers.map(u => `<div class="inline-block"><div class="info"><div class="image-wrap${u.pendant?.image ? ' has-frame' : ''}"><img class="face" src="${u.face}" referrerpolicy="no-referrer" />${u.pendant?.pid ? `<img class="face-frame" src="${u.pendant.image_enhance || u.pendant.image}" referrerpolicy="no-referrer" />` : ''}${u.face_nft ? `<img class="face-icon icon-face-nft${[0, 1].includes((u.official || u.official_verify)?.type) || u.vip?.status ? ' second' : ''}" src="https://www.yumeharu.top/images/default-faces%26face-icons/nft.gif" />` : ''}${(u.official || u.official_verify)?.type === 0 ? '<img class="face-icon" src="https://www.yumeharu.top/images/default-faces%26face-icons/personal.svg" />' : (u.official || u.official_verify)?.type === 1 ? '<img class="face-icon" src="https://www.yumeharu.top/images/default-faces%26face-icons/business.svg" />' : u.vip?.status ? '<img class="face-icon" src="https://www.yumeharu.top/images/default-faces%26face-icons/big-vip.svg" />' : ''}</div> <div><strong>${encodeHTML(u.name || u.uname)}</strong></div></div></div>`).join('');
const content = `<style>* { font-family: Lato, 'PingFang SC', 'Microsoft YaHei', sans-serif; font-size: 20px; overflow-wrap: anywhere; text-align: justify;}div.inline-block { display: inline-block; margin-right: 5px;}div.info { align-items: center; display: flex;}div.image-wrap { margin-right: 5px; position: relative;}img { vertical-align: middle;}img.face { border-radius: 50%; height: 60px;}img.icon-face-nft { border: 2px solid var(--background-color); box-sizing: border-box;}div.image-wrap.has-frame img.face { height: 51px; padding: 19.5px;}div.image-wrap.has-frame img.face-frame { height: 90px; left: calc(50% - 45px); position: absolute; top: 0;}div.image-wrap img.face-icon { border-radius: 50%; height: 18px; left: calc(50% + 13.25px); position: absolute; top: calc(50% + 13.25px);}div.image-wrap img.face-icon.second { left: calc(50% - 3.75px);}div.image-wrap.has-frame img.face-icon { left: calc(50% + 9px); top: calc(50% + 9px);}div.image-wrap.has-frame img.face-icon.second { left: calc(50% - 8px);}</style>${html}`;
fs.writeFileSync('followers.html', content); // 注意:请将 “followers.html” 修改成生成的 HTML 文件的名称再将网页转换成图片:
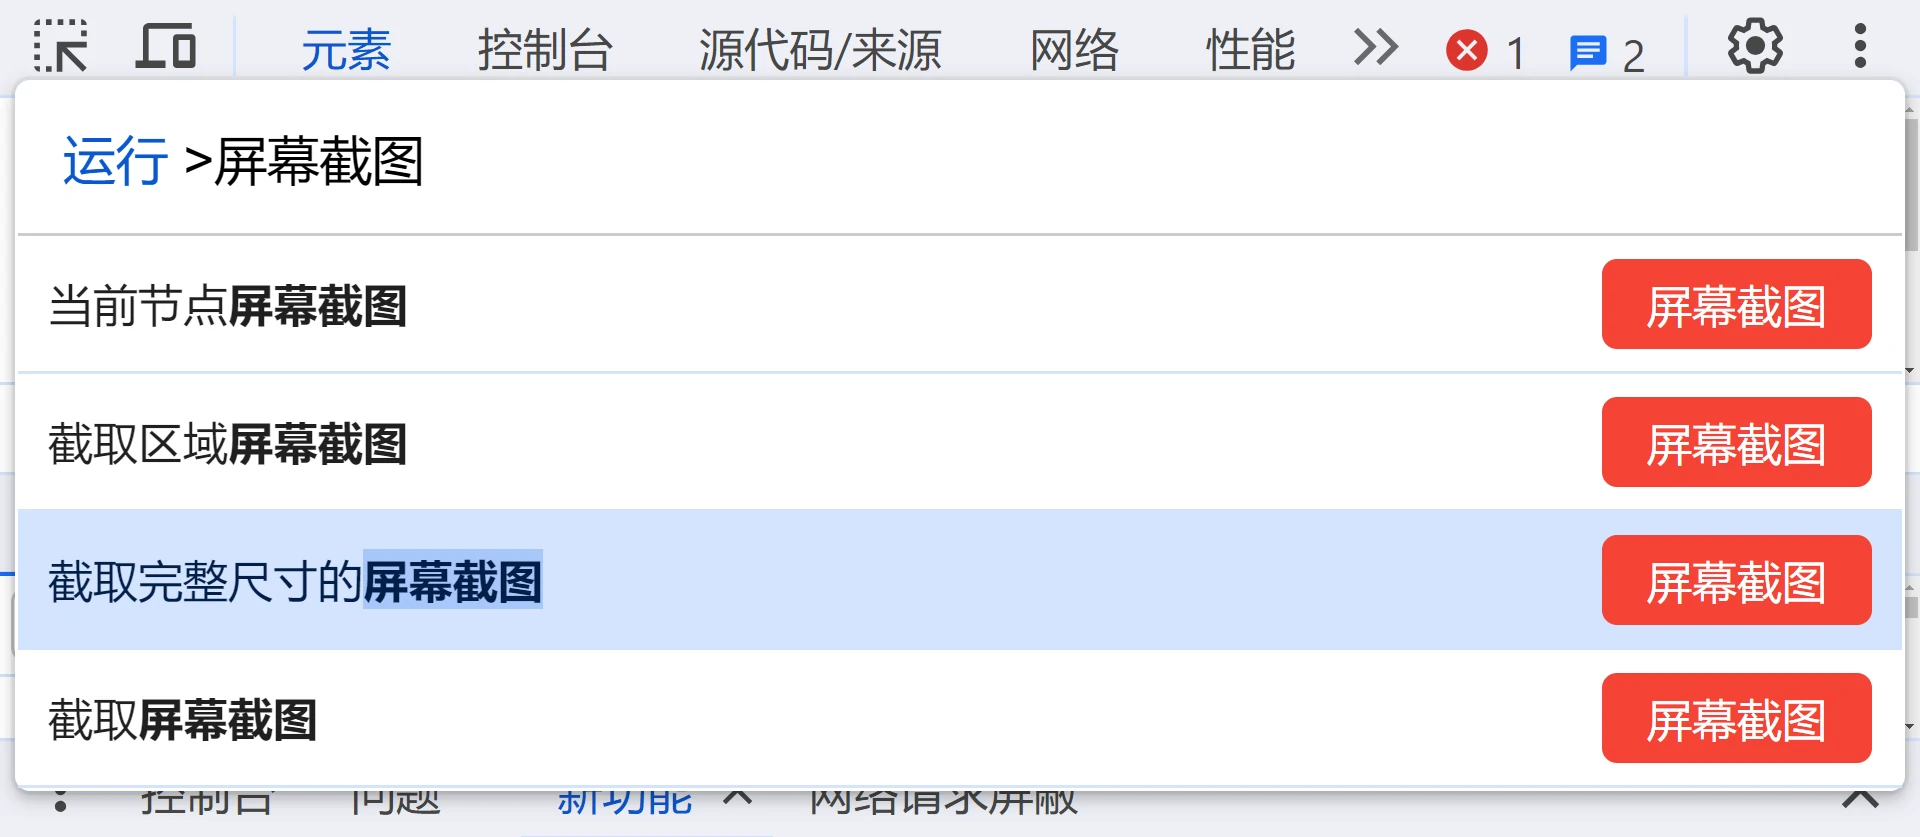
我们可以在浏览器中打开生成的文件,然后打开开发者工具(一般按 F12 键即可),点击右上角的三个点展开菜单,选择 “运行命令”(也可直接按下 Ctrl+Shift+P),输入 “屏幕截图”,再选择 “截取完整尺寸的屏幕截图”,并选择保存图片的位置,就可以保存一张包括所有粉丝的图片了。
🎯 总结
生成自己的所有粉丝列表的图片看似很难,实际上只有三个步骤,每个步骤不需要您进行太多操作。
下面的代码就是实现上述功能的完整代码,您可以复制代码并适当修改一下代码,运行脚本,就可以生成您自己的粉丝列表的图片了。
// 初始化const headers = { Cookie: 'SESSDATA=1a2b3c4d%2C1789012345%2C5e6f7*ef; bili_jct=0123456789abcdef0123456789abcdef', Origin: 'https://www.bilibili.com', Referer: 'https://www.bilibili.com/', 'User-Agent': 'Mozilla/5.0 (X11; Linux x86_64) AppleWebKit/537.36 (KHTML, like Gecko) Chrome/123.0.0.0 Safari/537.36' }; // 注意:此 Cookie 仅作为示例展示,请修改成自己的 Cookie
const encodeHTML = str => typeof str === 'string' ? str.replace(/&/g, '&').replace(/</g, '<').replace(/>/g, '>').replace(/"/g, '"').replace(/ (?= )|(?<= ) |^ | $/gm, ' ').replace(/\r\n|\r|\n/g, '<br />') : '';
// 获取自己的 UIDconst ujson = await (await fetch('https://api.bilibili.com/x/web-interface/nav', { headers })).json();const UID = ujson.data.mid;
// 获取可以获取到的粉丝的信息let followers = []; // 存储粉丝列表for (let i = 1; i <= 20; i++) { // 获取前 20 页粉丝的信息,每页 50 个;这里的页数是根据自己的粉丝数而定的 followers.push(...(await (await fetch(`https://api.bilibili.com/x/relation/fans?vmid=${UID}&ps=50&pn=${i}`, { headers })).json()).data.list);}
// 获取所有粉丝的详细信息const cjson = await (await fetch(`https://api.vc.bilibili.com/x/im/user_infos?uids=${followers.map(f => f.mid)}`, { headers })).json();if (cjson.code === 0 && cjson.data?.length) { for (const info of cjson.data) { Object.assign(followers.find(f => f.mid === info.mid), info); }}
// 获取所有粉丝的粉丝数const followersWithoutStat = followers.map(f => f.mid), sjsonList = [];
while (followersWithoutStat.length) { sjsonList.push(fetch(`https://api.bilibili.com/x/relation/stats?mids=${followersWithoutStat.splice(0, 20).join(',')}`, { headers }).then(resp => resp.json()));}
for await (const sjson of sjsonList) { if (sjson.code === 0 && sjson.data) { for (const [mid, stat] of Object.entries(sjson.data)) { Object.assign(followers.find(f => f.mid === +mid), stat); } }}
// 生成文件,此处提供了 2 种样式,您可以任选一个样式// 样式 1:每个粉丝之间换行const html = followers.map(u => `<div class="info"><div class="image-wrap${u.pendant?.image ? ' has-frame' : ''}"><img class="face" src="${u.face}" referrerpolicy="no-referrer" />${u.pendant?.pid ? `<img class="face-frame" src="${u.pendant.image_enhance || u.pendant.image}" referrerpolicy="no-referrer" />` : ''}${u.face_nft ? `<img class="face-icon icon-face-nft${[0, 1].includes((u.official || u.official_verify)?.type) || u.vip?.status ? ' second' : ''}" src="https://www.yumeharu.top/images/default-faces%26face-icons/nft.gif" />` : ''}${(u.official || u.official_verify)?.type === 0 ? '<img class="face-icon" src="https://www.yumeharu.top/images/default-faces%26face-icons/personal.svg" />' : (u.official || u.official_verify)?.type === 1 ? '<img class="face-icon" src="https://www.yumeharu.top/images/default-faces%26face-icons/business.svg" />' : u.vip?.status ? '<img class="face-icon" src="https://www.yumeharu.top/images/default-faces%26face-icons/big-vip.svg" />' : ''}</div> <div><strong>${encodeHTML(u.name || u.uname)}</strong></div></div>`).join('');
// 样式 2:一个粉丝紧跟着另一个粉丝const html = followers.map(u => `<div class="inline-block"><div class="info"><div class="image-wrap${u.pendant?.image ? ' has-frame' : ''}"><img class="face" src="${u.face}" referrerpolicy="no-referrer" />${u.pendant?.pid ? `<img class="face-frame" src="${u.pendant.image_enhance || u.pendant.image}" referrerpolicy="no-referrer" />` : ''}${u.face_nft ? `<img class="face-icon icon-face-nft${[0, 1].includes((u.official || u.official_verify)?.type) || u.vip?.status ? ' second' : ''}" src="https://www.yumeharu.top/images/default-faces%26face-icons/nft.gif" />` : ''}${(u.official || u.official_verify)?.type === 0 ? '<img class="face-icon" src="https://www.yumeharu.top/images/default-faces%26face-icons/personal.svg" />' : (u.official || u.official_verify)?.type === 1 ? '<img class="face-icon" src="https://www.yumeharu.top/images/default-faces%26face-icons/business.svg" />' : u.vip?.status ? '<img class="face-icon" src="https://www.yumeharu.top/images/default-faces%26face-icons/big-vip.svg" />' : ''}</div> <div><strong>${encodeHTML(u.name || u.uname)}</strong></div></div></div>`).join('');
const content = `<style>* { font-family: Lato, 'PingFang SC', 'Microsoft YaHei', sans-serif; font-size: 20px; overflow-wrap: anywhere; text-align: justify;}div.inline-block { display: inline-block; margin-right: 5px;}div.info { align-items: center; display: flex;}div.image-wrap { margin-right: 5px; position: relative;}img { vertical-align: middle;}img.face { border-radius: 50%; height: 60px;}img.icon-face-nft { border: 2px solid var(--background-color); box-sizing: border-box;}div.image-wrap.has-frame img.face { height: 51px; padding: 19.5px;}div.image-wrap.has-frame img.face-frame { height: 90px; left: calc(50% - 45px); position: absolute; top: 0;}div.image-wrap img.face-icon { border-radius: 50%; height: 18px; left: calc(50% + 13.25px); position: absolute; top: calc(50% + 13.25px);}div.image-wrap img.face-icon.second { left: calc(50% - 3.75px);}div.image-wrap.has-frame img.face-icon { left: calc(50% + 9px); top: calc(50% + 9px);}div.image-wrap.has-frame img.face-icon.second { left: calc(50% - 8px);}</style>${html}`;
fs.writeFileSync('followers.html', content); // 注意:请将 “followers.html” 修改成生成的 HTML 文件的名称下面的图片就是梦春酱在 2022 年 10 月 15 日生成的粉丝列表图片。
 长期维护版应用程序接口应用程序接口应用程序接口top levelasyncarrayobject应用程序接口应用程序接口应用程序接口应用程序接口超文本标记语言超文本标记语言
分享文章
生成精美分享图或复制链接,与更多人分享本文。
继续阅读
换条路线
从其他文章中稳定抽取
最后更新于 ,距今已过 1 天
部分内容可能已过时
评论
评论加载失败